


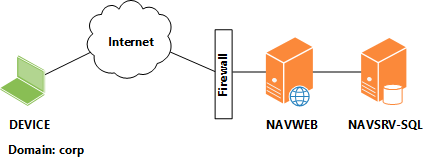
In this walkthrough, you will install the tiers of the Microsoft Dynamics NAV Web client in a production environment, where the Microsoft Dynamics NAV Web client is on one computer and Microsoft Dynamics NAV Server and Microsoft SQL Server with Microsoft Dynamics NAV database components are on another computer.
The following table describes the components in this scenario.
| Computer | Installed operating system and software | ||
|---|---|---|---|
NAVSRV-SQL | Windows 7, Windows Server 2008, Windows Server 2008 R2, Windows 8, or Windows Server 2012 with the 64-bit edition of SQL Server 2008 R2 installed. You will install Microsoft Dynamics NAV database components and Microsoft Dynamics NAV Server on this computer.
| ||
NAVWEB | Windows 7, Windows Server 2008, Windows Server 2008 R2, Windows 8, or Windows Server 2012. Internet Information Services 7 or Internet Information Services 8.
You will install the Microsoft Dynamics NAV Web Server components on this computer. | ||
DEVICE | A device with an Internet connection and a web browser. |
 Note Note |
|---|
| For a complete list of supported hardware and software, see System Requirements for Microsoft Dynamics NAV 2013 R2. |
The key characteristic of this walkthrough is that the Microsoft Dynamics NAV Web Server components and Microsoft Dynamics NAV Server are installed on separate computers. Because of the multiple computers involved when a device tries to access the Microsoft Dynamics NAV Web client over the Internet to manage Microsoft Dynamics NAV data, additional configuration is required to set up this environment compared to an environment where all components are on a single computer.
 About This Walkthrough
After completing this walkthrough, you will have a functioning four-tier installation on two computers. The installation uses the CRONUS International Ltd. demonstration database, which contains the CRONUS International Ltd. company. Windows authentication is used for authenticating users who try to access the Microsoft Dynamics NAV Web client.
This walkthrough illustrates the following tasks:
-
Using a domain user account as the service account for Microsoft Dynamics NAV Server and the Microsoft Dynamics NAV database.
- Installing the Microsoft Dynamics NAV Database Components and Microsoft Dynamics NAV Server
- Installing the Microsoft Dynamics NAV Web Server Components
- Configuring Constrained Delegation from the Microsoft Dynamics NAV Web Client to Microsoft Dynamics NAV Server
- Allowing Inbound Communication to the Microsoft Dynamics NAV Web Client Through the Windows Firewall
- Opening to the Microsoft Dynamics NAV Web Client
Prerequisites
To complete this walkthrough, you will need:
-
Microsoft Dynamics NAV 2013 R2 installation media. For example, this can be a DVD or a network drive that contains the Microsoft Dynamics NAV 2013 R2 installation files.
-
Two computers that are configured as described in the introduction.
On the NAVWEB computer, you must enable IIS with the required features for the Microsoft Dynamics NAV Web client. For instructions about how to install Internet Information Services, see How to: Install and Configure Internet Information Services for Microsoft Dynamics NAV Web Client.Note Instead of installing and configuring IIS manually, you can use Microsoft Dynamics NAV Setup to install IIS and enable the required features, as described in this walkthrough. -
A domain user account for accessing Microsoft Dynamics NAV Server and Microsoft Dynamics NAV database on the Microsoft SQL Server. The user account must have the following permissions:
-
Permission to log on as a service on the computer where you will install Microsoft Dynamics NAV Server and the computer that is running SQL Server.
-
Permission to register Service Principal Names (SPNs) on itself.
If the user account does not have this permission, then you must register SPNs for the account manually.
Note By default, Microsoft Dynamics NAV Setup uses NETWORK SERVICE as the service account. You can use NETWORK SERVICE instead of a domain user account, but this is considered less secure. If you want to use NETWORK SERVICE, then you do not need this prerequisite. -
Permission to log on as a service on the computer where you will install Microsoft Dynamics NAV Server and the computer that is running SQL Server.
Story
Viktor is a Microsoft Certified Partner working for CRONUS International Ltd. He has been tasked with deploying Microsoft Dynamics NAV Web client for a customer. Viktor is a Microsoft Certified Partner working for CRONUS International Ltd. He has been tasked with deploying Microsoft Dynamics NAV Web client for customer. To meet the customer's requirements, Viktor has decided to deploy the Microsoft Dynamics NAV Web client as follows:
-
Install the Microsoft Dynamics NAV Web Server components on one computer, and install Microsoft Dynamics NAV Server and SQL server with Microsoft Dynamics NAV database components on another computer.
-
Install the Microsoft Dynamics NAV Web Server components on HTTP port 8080.
-
Use a domain user account instead of the Network Service account as the service account for Microsoft Dynamics NAV Server.
-
Use Windows Authentication to authenticate users.
Installing the Microsoft Dynamics NAV Database Components and Microsoft Dynamics NAV Server
In this procedure, you run Microsoft Dynamics NAV 2013 R2 Setup to install the SQL Server Database components for Microsoft Dynamics NAV, including the CRONUS International Ltd. demonstration database, and Microsoft Dynamics NAV Server. During setup, you will assign the domain user account as the service account for the database.
| Note |
|---|
| If you already have an existing Microsoft Dynamics NAV Server and Microsoft Dynamics NAV database that you want to use for the Microsoft Dynamics NAV Web client, you can skip this procedure. |
To install the Microsoft Dynamics NAV database components and Microsoft Dynamics NAV Server
On the NAVSRV-SQL computer, access the Microsoft Dynamics NAV installation media.
Run the setup.exe file to start the Microsoft Dynamics NAV Setup wizard.
On the Welcome to Microsoft Dynamics NAV 2013 R2 Setup page, choose the Next button.
To accept the license terms, choose I accept.
On the Microsoft Dynamics NAV Setup page, choose Choose an installation option.
On the Choose an installation option page, under the Server option, choose Customize.
On the Customize the installation page, select SQL Server Database Components, and then select Run all from my computer.
This specifies that you want to install this component and all subcomponents. In this case, there is a single subcomponent, which is the CRONUS International Ltd. demonstration database.
Note The Server option, which installs Microsoft Dynamics NAV Server, is automatically chosen. Choose the Next button to proceed to the Specify parameters page.
The Specify parameters page contains many parameters that you can configure, but default parameters are provided for all except Server Account and SQL Server.
Set the Server account to the domain user account that you created for the Microsoft Dynamics NAV database and Microsoft Dynamics NAV Server.
In the SQL Server box, type localhost to specify the computer that you are working on.
If you have an existing database for Microsoft Dynamics NAV on the computer, and you want to replace it with the CRONUS International Ltd. demonstration database, then set the Replace Existing Database box to Yes.
Choose the Apply button.
Setup installs the components.
After the installation is complete, choose the Close button.
Installing the Microsoft Dynamics NAV Web Server Components
In this procedure, you use Microsoft Dynamics NAV 2013 R2 Setup to install the Microsoft Dynamics NAV Web Server components on the NAVWEB computer.
To install Microsoft Dynamics NAV Web Server components by using Setup
On the NAVWEB computer, access the Microsoft Dynamics NAV installation media.
Run the setup.exe file to start the Microsoft Dynamics NAV Setup wizard.
Choose the Next button.
To accept the license terms, choose I accept.
On the Microsoft Dynamics NAV Setup page, choose Choose an installation option.
On the Choose an Installation Option page, choose Custom.
On the Customize the Installation page, select NAV Web Server Components, and then choose Run from My Computer.
Choose the Next button to go to the Specify Parameters page.
On the Specify parameters page, in the Server Name box, type the name of the computer that is running Microsoft Dynamics NAV Server, in this case, NAVSRV.
In the Web Server Components section, set the Port field to 8080.
Set the Install IIS prerequisites parameter to Install.
This enables the IIS features that are required for the Microsoft Dynamics NAV Web client on the computer. For more information about this parameter, see Using Microsoft Dynamics NAV Setup to Install IIS Features.
Choose the Apply button to complete the installation.
When Setup is finished, choose the Close button.
A website that has the name Microsoft Dynamics NAV 2013 R2 Web Client has been installed on IIS. The website uses port 8080. A website that has the name Microsoft Dynamics NAV 2013 R2 Web Client has been installed on IIS. The website includes a web server instance for Microsoft Dynamics NAV Web client that has the name DynamicsNAV71. The default physical path of the web server instance is C:\inetpub\wwwroot\DynamicsNav71\.
Configuring Constrained Delegation from the Microsoft Dynamics NAV Web Client to Microsoft Dynamics NAV Server
When the client device, Microsoft Dynamics NAV Web Server components, and Microsoft Dynamics NAV Server are on separate computers, the client device interacts with Microsoft Dynamics NAV Server through the computer that is running Microsoft Dynamics NAV Web Server components. The computer that is running Microsoft Dynamics NAV Web Server components is performing actions on the client device's behalf. This process is known as impersonation. Impersonation cannot be used across multiple computers, so you must set up delegation from the computer that is running Microsoft Dynamics NAV Web Server components to Microsoft Dynamics NAV Server.
To configure delegation, you must perform two tasks. First, you delegate access from the computer that is running Microsoft Dynamics NAV Web client to the computer that is running Microsoft Dynamics NAV Server. Second, you configure the kernel mode authentication for the Microsoft Dynamics NAV Web client.
Delegating Access from the Web Server to Microsoft Dynamics NAV Server
Configuring delegation means explicitly configuring the computer that is running Microsoft Dynamics NAV Web Server components (NAVWEB) to delegate its access to the Microsoft Dynamics NAV Server (NAVSRV-SQL) on behalf of the device (DEVICE) that is trying to connect to Microsoft Dynamics NAV. To make the access more secure, you specify delegation to a specific service on a specific server. This is known as constrained delegation.
| Note |
|---|
| You must run the following procedure on a domain controller computer or a computer that is installed with Active Directory Domain Services tools. |
To delegate access to Microsoft Dynamics NAV Server
On the domain controller computer for your network, or a computer that is installed with Active Directory Domain Services tools, choose Start, and then choose Run.
In the Open field, type dsa.msc.
This opens the Active Directory Users and Computers utility.
Expand the node for the domain where you have installed the Microsoft Dynamics NAV environment. For this example, the domain in the walkthrough is Corp.
Select the Computers node, right-click the NAVWEB computer, and then choose Properties.
On the Delegation tab, choose Trust this user for delegation to specified services only, and then choose Use Kerberos only.
You must add the following service entries for the computer that is running Microsoft Dynamics NAV Server, which in this walkthrough is NAVSRV-SQL.
Service type User or computer Port DynamicsNAV
NAVSRV-SQL
7046
DynamicsNAV
NAVSRV-SQL.corp
7046
HOST
NAVSRV-SQL
HOST
NAVSRV-SQL.corp
To add the services, select Expanded, and then choose Add.
In the Add Services window, choose Users or Computers.
In the Enter the object names to select box, type the name of the computer that is running Microsoft Dynamics NAV Server, in this case NAVSRV-SQL, and then choose the OK button.
In the list of available services, press and hold the Ctrl key, select DynamicsNAV for port 7046 and HOST, and then choose the OK button.
Choose the OK button to close the dialog box.
Configuring Kernel Mode Authentication
By default, Windows authentication in IIS is set to use kernel mode authentication. Kernel-mode authentication improves authentication performance. However, when you use delegation with Kerberos, you must either disable kernel mode or configure it to use the credentials of the application pool of Microsoft Dynamics NAV Web client. Otherwise, authentication will fail and Microsoft Dynamics NAV Web client will not be able to connect to Microsoft Dynamics NAV Server. This is because kernel mode authentication runs under the computer account of the computer that is running Microsoft Dynamics NAV Web Server components, while the Microsoft Dynamics NAV Web client runs under the user account of the user trying to access Microsoft Dynamics NAV.
As a best practice, you should configure kernel mode authentication to use the application pool credentials as described in this walkthrough.
To configure kernel mode authentication to use the application pool credentials
On the NAVWEB computer, using a text editor such as Notepad, open the applicationHost.config file for IIS. By default, the file is located in the c:\Windows\System32\inetsrv folder.
Locate the
<location path="Microsoft Dynamics NAV 2013 Web Client">element.Change the
<windowsAuthentication enabled="true">element to the following. Copy Code
<windowsAuthentication enabled="true" useAppPoolCredentials="true" />
Save the file.
Restart IIS. To restart IIS in a command prompt, do the following:
-
On the Start menu, choose Run.
-
In the Open box, type cmd, and then choose the OK button.
-
At the command prompt, type iisreset, and then press Enter.
 Tip
Tip You can also restart IIS using Internet Information Services Manager, if you have it installed. -
On the Start menu, choose Run.
Allowing Inbound Communication on the Microsoft Dynamics NAV Web Client Port Through the Windows Firewall
By default, the Microsoft Dynamics NAV Web client is configured for communication on port 8080 of the computer. This port is typically blocked by Windows Firewall. To allow communication to the Microsoft Dynamics NAV Web client from client devices, you must create an inbound rule on the port 8080 in the Windows Firewall setup.
| Note |
|---|
| You do not have to perform this task if the computer is running Windows Server 2008, Windows Server 2008 R2, or Windows Server 2012 because communication on the port is automatically allowed by Windows Firewall. |
To create an inbound rule on the port that is used by Microsoft Dynamics NAV Web client
On the NAVWEB computer, on the Start menu, choose Control Panel, choose System and Security, and then choose Windows Firewall.
In the navigation pane, choose Advanced settings.
In the Windows Firewall with Advanced Settings window, in the navigation pane, choose Inbound Rules, and then in the Actions pane, choose New Rule.
On the Rule Type page, choose Port, and then choose the Next button.
On the Protocol and Ports page, choose Specific local ports, and then type a port number in the box. For example, type 8080 for the default port of the Microsoft Dynamics NAV Web client.
Choose the Next button.
On the Action page, choose Allow the connection, and then choose the Next button.
On the Profile page, choose the profiles, and then choose the Next button.
On the Name page, type a name for the rule, and then choose the Finish button.
Opening the Microsoft Dynamics NAV Web client
You can open the Microsoft Dynamics NAV Web client from a device with a supported web browser.
To open the Microsoft Dynamics NAV Web client
Open the web browser.
In the address box, type the following URL:
http://ComputerName:PortNumber/DynamicsNAV71/WebClient/List.aspx
-
Substitute ComputerName with the name of the computer that is running the Microsoft Dynamics NAV Web Server components.
-
Substitute PortNumber with the port that you configured for the Microsoft Dynamics NAV Web Server components during Setup.
-
Substitute DynamicsNAV71 with the name of the Microsoft Dynamics NAV Server instance that you configured during Setup. DynamicsNAV71 is the default value.
For this walkthrough, you would use the following URL:
http://navweb:8080/DynamicNAV70/WebClient/List.aspx
-
Substitute ComputerName with the name of the computer that is running the Microsoft Dynamics NAV Web Server components.
Troubleshooting
If you are cannot connect the Microsoft Dynamics NAV Web client or you are experiencing problems, see Troubleshooting the Microsoft Dynamics NAV Web Client Installation.
Next Steps
The following is a list of typical tasks to perform after you install Microsoft Dynamics NAV Web client.
-
Secure the connection to Microsoft Dynamics NAV Web client using SSL. For more information, see How to: Configure SSL to Secure the Connection to Microsoft Dynamics NAV Web Client.
-
Upload your license. For more information, see How to: Upload the License File.
-
Create users and integrate them into the Microsoft Dynamics NAV security system. For more information, see About Users.
See Also
Tasks
Walkthrough: Installing the Microsoft Dynamics NAV Web Client Tiers on Three ComputersWalkthrough: Installing the Microsoft Dynamics NAV Web Client Tiers on One Computer
Concepts
Deploying the Microsoft Dynamics NAV Web ClientDeploying the Microsoft Dynamics NAV Web Client on Two Computers
Microsoft Dynamics NAV Web Client Network Architecture
Configuring Microsoft SQL Server
Configuring Microsoft Dynamics NAV Server