


XMLports are used to export data from a Microsoft Dynamics NAV database to XML format or import data from an XML file to Microsoft Dynamics NAV database. Exporting data from your Microsoft Dynamics NAV database into XML format enables seamless exchange of information between different computer systems. You only need a basic knowledge of XML to design and work with XMLports.
XMLports are called and run from codeunits or run from Object Designer. In this walkthrough, you will call the XMLport from a codeunit. You define the output stream that will export the data and location where the XML document should be saved in the codeunit.
 About This Walkthrough
This walkthrough shows you how to export data from a Microsoft Dynamics NAV table into an XML document. This walkthrough illustrates the following tasks:
-
Creating an XMLport.
-
Compiling and saving the XMLport.
-
Creating the codeunit that will run the XMLport.
-
Running the XMLport.
Prerequisites
To complete this walkthrough, you will need:
-
Microsoft Dynamics NAV 2013 R2 installed with a developer license.
-
The CRONUS International Ltd. demonstration database.
Story
Simon is a Microsoft Certified Partner working for CRONUS International Ltd. He has been asked to export records from the Customer table to an XML document. The records will include only the No., Name, Address, City, and Contacts fields. The information will be shared with another colleague who works on a different computer system. Simon knows that he can use XMLports to convert the records in the table to XML format that can easily be shared with the colleague.
Creating the XMLport
You create the XMLport by designing it in XMLport Designer and setting the properties for the XMLport. You define the table and fields that you want to export in XMLport Designer. You then compile and save the XMLport.
To create the XMLport
In the Microsoft Dynamics NAV Development Environment, on the Tools menu, choose Object Designer.
In Object Designer, choose XMLport, and then choose New to open XMLport Designer.
Select an empty row in the designer. On the View menu, choose Properties to open the XMLport-Properties window.
In the XMLport-Properties window, locate the Direction Property, choose the drop-down arrow in the Value column and then set it to Export.
In the XMLport-Properties window, locate the Format Property (XMLports), verify that the Value column is set to XML and then close the XMLport-Properties window.
In XMLport Designer, in the first row, in the Node Name column, enter Root.
In the Node Type column, verify that Element is selected.
In the Source Type column, verify that Text is selected. This node represents the beginning of the XML document.
In the second row, in the Node Name column, enter Customer.
In the Node Type column, select Element.
In the Source Type column, select Table. This node represents a customer record in the XML document.
In the Data Source column, select the Customer table (18) from the Table List window. The data will be exported from the Customer table.
Select the Customer row and use the right arrow button to indent the row one time to make it a subset of the Root element.
The next step is to select the fields that you want to export.
In the next empty row under the Customer row, in the Node Type column, select Element.
In the Source Type column, select Field.
In the Data Source column, select the No. field from the Field Lookup window, and then choose the OK button.
In the Node Name column, enter a name for the field. For example, you can enter No. This node represents the fields in the record. You can enter any name, but because of consistency you might want to enter the name of field that you select.
 Note
Note The name that you enter in the Node Name column cannot contain spaces. White space in the name will result in a compile error. Select the No. row and use the right arrow button to indent the field one time to make it a subset of the Customer element.
Repeat these steps to select additional fields that you want to export. For this walkthrough you can select the following fields.
Node Name Node Type Source Type Data Source No.
Element
Field
Customer::No.
Name
Element
Field
Customer::Name
Address
Element
Field
Customer::Address
City
Element
Field
Customer::City
Contact
Element
Field
Customer::Contact
On the File menu, choose Save As.
In the Save As window, enter 50001 in the ID text box.
In the Name text box, enter CustomerXMLport, verify that the Compiled check box is selected, and then choose the OK button. You will use the name of the XMLport later in the codeunit.
Close XMLport Designer.
Creating the Codeunit to Export the Data
After you have created the XMLport, you create the codeunit that will run the XMLport and save the data. In this walkthrough, you will save the XML document on the client computer. To do this, you create the file in a temporary folder, and then download it to the client after the export is completed. In the codeunit, you will specify the path of the temporary file and the path where the XML document will be saved on the client.
To create the codeunit
In Object Designer, select Codeunit, and then choose New to open the C/AL Editor.
You will declare variables that you will use in the code. You will create variables for the XML file, the output stream that exports the data, and the return value for the EXPORT Function (XMLport). You will also create variables for the file that will be downloaded from the server and the file that will be saved on the client.
In the C/AL Editor, place the cursor in the OnRun function, and then, on the View menu, choose C/AL Locals to open the C/AL Locals window.
On the Variables tab, in the Name column, enter CustXmlFile.
In the DataType column, choose the drop-down arrow and select File. This variable represents the XML file.
Repeat steps 3 and 4 to create the following additional variables.
Variable name DataType CustXmlFile
File
XmlStream
OutStream
IsExported
Boolean
FromFile
Text
ToFile
Text
You will create the text constants that will store messages that are displayed in the message boxes.
In the C/AL Locals window, choose the Text Constants tab.
In the Name field, enter Text000 and then in the ConstValue field, choose the EditAssist button to open the Multilanguage Editor.
In the Multilanguage Editor, in the Language field, select ENU from the Windows Language List window and then choose the OK button.
In the Value field, enter the following text: The Customer table export to XML is completed.
Create another text constant that is named Text001 with value The Export Failed.
Note The text constants are optional. However they enable messages to be translated into different languages. Close the C/AL Locals window.
In the C/AL Editor, in the OnRun trigger, add the following code.
 Copy Code
CustXmlFile.CREATE(TEMPORARYPATH + 'Customer.xml');
CustXmlFile.CREATEOUTSTREAM(XmlStream);
IsExported := XMLPORT.EXPORT(XMLPORT::CustomerXMLport, XmlStream);
FromFile := CustXmlFile.NAME;
ToFile := 'CustomerClient.xml';
CustXmlFile.CLOSE;
IF IsExported THEN
BEGIN
  DOWNLOAD(FromFile,'Download file','C:\Temp','Xml file(*.xml)|*.xml',ToFile);
  ERASE(FromFile);
  MESSAGE(Text000);
END
ELSE
  MESSAGE(Text001);
The code uses the CREATE Function (File) to create an XML file that is named CustXmlFile in a temporary folder on the server. The TEMPORARYPATH Function gets the path of the temporary folder. The CREATEOUTSTREAM Function (File) opens a data stream to output the data from the table to the XML file. The EXPORT Function (XMLport) uses the XMLport and the stream to export the data. If the export succeeds, the DOWNLOAD Function (File) downloads the file from the temporary folder on the computer that is running Microsoft Dynamics NAV Server to the client. The default path of the file on the client computer is set to ‘C:\Temp’ but you can change it in the download dialog box. A message is displayed at the end of the export to indicate that the export is completed. Otherwise, an error message is displayed. This message is not required but it lets the user know that something actually occurred. The temporary file is deleted after the download is completed.
Close the C/AL Editor and choose the Yes button at the prompt.
In the Save As dialog box, in the ID text box, enter 50000.
In the Name text box, enter ExportCode.
Verify that the Compiled check box is selected and then choose the OK button.
Running the XMLport
After the XMLport is created and the codeunit is written, you run the codeunit to export the data.
To run the XMLport
In Object Designer, select the ExportCode codeunit (50000), and then choose the Run button. The Microsoft Dynamics NAV Windows client opens and the Export File dialog box is displayed. You can choose the Open button to open and view the file or choose the SAVE button to save it. In this walkthrough, you will save the file.
Choose the SAVE button to open the download window.
In the Download file window, choose the SAVE button. You can change the default name of the file and location where it will be saved.
After the export is complete, browse to the location where the XML document was saved and open it. Notice that all the records in the table are now in XML format. The
<Customer></Customer>element represents a record and each record contains the fields that you selected in the XMLport Designer.The XML file that is exported resembles the XML file in the following illustration. The XML file contains data for only the first four customers.
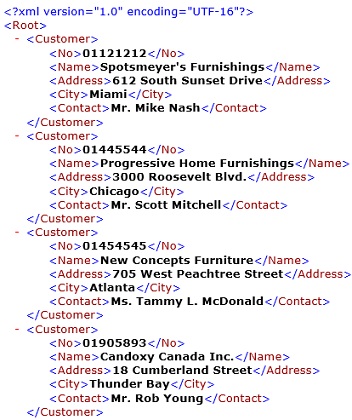
XML file that was exported from the Customer table
Next Steps
You can also use XMLport to import data from an XML document to a table. For more information, see Walkthrough: Importing Data from XML Documents to Tables.