


The following walkthrough demonstrates how to use the Example-1VM.ps1 script of the Microsoft Dynamics NAV Provisioning Tools for Windows Azure to deploy Microsoft Dynamics NAV on Windows Azure from a local computer. The walkthrough deploys the Microsoft Dynamics NAV components, including the CRONUS International Ltd. demonstration database, on a single virtual machine as illustrated in the following figure.
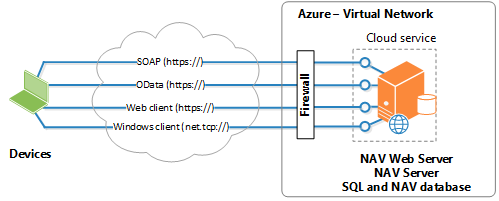
When completed, you will have a new virtual machine on Windows Azure with a fully functional Microsoft Dynamics NAV environment that gives users access to Microsoft Dynamics NAV data from the Microsoft Dynamics NAV Windows client and Microsoft Dynamics NAV Web client.
 For a video demonstration, see How Do I: Automate Provisioning of Microsoft Dynamics NAV 2013 on a Windows Azure Virtual Machine
 About This Walkthrough
This walkthrough illustrates the following tasks:
- Start Windows PowerShell ISE
- Modifying the Set-PartnerSettings File
- Running the Example-1VM Script
- Opening the RoleTailored Clients
This walkthrough sets up a Microsoft Dynamics NAV environment on Windows Azure that has the following characteristics.
| Item | Value | ||
|---|---|---|---|
Azure virtual machine name | MyNavVM | ||
Administrator account on Windows Azure virtual name | User name: NavVmAdmin Password: 123NavVm!a
| ||
Azure region | North Europe | ||
Virtual machine size | Small | ||
User authentication credential type | NavUserPassword | ||
Service account for Microsoft Dynamics NAV Server | User name: NSTService Password: P@ssword312 | ||
Microsoft Dynamics NAV user with SUPER permissions | User name: navuser Password: N@Vpw312 | ||
Client services port | 9001 | ||
SOAP services port | 9002 | ||
OData services port | 9003 | ||
ClickOnce website port | 9004 |
Prerequisites
To complete this walkthrough, you will need to install the prerequisites that are described in Preparing for Deploying Microsoft Dynamics NAV on Windows Azure.
The following table includes information about the prerequisites that are used to complete this walkthrough.
| Item | Information | ||
|---|---|---|---|
PublishSettings file | C:\Users\Administrator\MyAzure-2-21-2013.publishsettings | ||
Azure subscription name | MyAzureSubscription | ||
Azure storage account | MyAzureStorage | ||
Image for virtual machine | fb83b3509582419d99629ce476bcb5c8__Microsoft-SQL-Server-2012SP1-Standard-CY13SU04-SQL2012-SP1-11.0.3350.0-Win2012
| ||
Microsoft Dynamics NAV installation media (DVD) location | D:\NAVDVD | ||
Microsoft Dynamics NAV database backup file location | D:\NAVDVD\SQLDemoDatabase\CommonAppData\Microsoft\Microsoft Dynamics NAV\71\Database\Demo Database NAV (7-1).bak | ||
Microsoft Dynamics NAV license | D:\NAVDVD\SQLDemoDatabase\CommonAppData\Microsoft\Microsoft Dynamics NAV\71\Database\Cronus.flf | ||
Microsoft Dynamics NAV Provisioning Tools for Windows Azure location | C:\Cloud | ||
Security certificate PFX file location and password for Microsoft Dynamics NAV client services | File: C:\Cloud\HowTo\MyAzureVM.pfx Password: pfxpassword | ||
Security certificate PFX file and password for the Microsoft Dynamics NAV Web client. | This walkthrough uses the security certificate that is automatically generated by the provisioning tools. No action is required for this prerequisite. | ||
Security certificate PFX file location and password for ClickOnce | File: C:Cloud\HowTo\ClickOnceSignature.pfx Password: clickoncesignaturepassword | ||
Windows Azure Libraries location | C:\ProgramFiles(x86)\Microsoft SDKs\Windows Azure\PowerShell\Azure\Azure.psd1 | ||
Microsoft Windows HTTP Services Certificate Configuration Tool | C:\ProgramFiles(x86)\Windows Resource Kits\Tools\winhttpcertcfg.exe | ||
Manifest Generation and Editing Tool (mage.exe) | C:\ProgramFiles(x86)\Microsoft SDKs\Windows\v8.0A\bin\NETFX 4.0 Tools\mage.exe | ||
makecert.exe | C:\ProgramFiles(x86)\Windows Kits\8.0\bin\x86\makecert.exe |
Start Windows PowerShell ISE
To deploy Microsoft Dynamics NAV, you will run Windows PowerShell scripts. The procedures in this section use Windows PowerShell Integrated Scripting Environment (ISE) because it enables you to run commands, and write and debug scripts in a single graphical user interface.
 Important Important |
|---|
| You must run Windows PowerShell ISE as an Administrator; otherwise the scripts will not run without errors. |
To start Windows PowerShell ISE
On the provisioning computer, choose Start, and then search for Windows PowerShell ISE.
Right-click the Windows PowerShell ISE item, and then choose Run as Administrator.
At the command prompt, change to the \Windows PowerShell Scripts\Cloud\HowTo folder of the provisioning tools.
For example, enter the following code, and then press Enter:
 Copy Code
cd C:\Cloud\HowTo
Modifying the Set-PartnerSettings File
The Microsoft Dynamics NAV Provisioning Tools for Windows Azure include the Set-PartnerSettings.ps1 script. The Set-PartnerSettings.ps1 script contains parameters that are used by the Example-1VM.ps1 file to configure the Microsoft Dynamics NAV deployment. In this procedure, you will create a copy of the Set-PartnerSettings.ps1 file, and then modify the copy to include the settings for your installation. You could modify Set-PartnerSetting.ps1 directly, but using a copy enables you to test different parameter values without having to change Set-PartnerSettings.ps1 every time.
To make a copy of the Set-PartnerSettings.ps1 file
In Windows PowerShell ISE, on the File menu, choose Open, and then find and open the Set-PartnerSettings.ps1 file.
The file is located in the Cloud\Howto folder.
On the File menu, choose Save As.
Save the file in the same folder as Set-PartnerSettings.ps1 and give it the name Set-PartnerSettings-CUSTOM.ps1.
Because you save this file in the same folder as Set-PartnerSettings.ps1, the Set-PartnerSettings-CUSTOM.ps1 file is automatically loaded by the Example_1VM.ps1 script.
 Note
Note By default, the example scripts search the Cloud\HowTo folder for files that contain the text "custom" in the file name, so it is important that only one custom settings file is included in the folder when you run the scripts.
To modify the Set-PartnerSettings-Custom.ps1 file
In the Set-PartnerSettings-Custom.ps1 file, locate the Windows Azure subscription settings section.
The parameters in this section configure Windows Azure subscription settings.
By default, all parameters are commented lines that are preceded by
# TODO. To set a parameter, delete the# TODO, and then provide a value for the parameter.Go to the following line of code that specifies the PublishSettings file for the Windows Azure subscription:
Copy Code# TODO: $NAV_PublishSettingsFile = 'C:\users\administrator\MySubscription.PublishSettings'
To set the parameter for this walkthrough, change the code to the following:
Copy Code$NAV_PublishSettingsFile = 'C:\users\administrator\MyAzure-2-21-2013.publishsettings'
You change all parameters in this manner.
 Tip
Tip For a detailed description about a parameter, see the help text that comes before the parameter in the script. Change the remaining parameters in this section as follows:
Copy Code$NAV_AzureSubscriptionName = 'MyAzureSubscription' $NAV_AzureStorageAccount = 'MyAzureStorage'
Go to the Windows Azure virtual machine settings section to specify parameters for the virtual machine that will be created on Windows Azure. Set the parameters as follows:
Copy Code$NAV_AzureServiceName = 'MyNavVm' $NAV_VMAdminUserName = 'NavVmAdmin' $NAV_VMAdminPassword = '123NavVm!a' $NAV_AzureLocation = 'North Europe' $NAV_VMSize = 'Small' $$NAV_OSImageWithSqlServer = 'fb83b3509582419d99629ce476bcb5c8__Microsoft-SQL-Server-2012SP1-Standard-CY13SU04-SQL2012-SP1-11.0.3350.0-Win2012'
Go to the Microsoft Dynamics NAV installation settings section to specify parameters that install Microsoft Dynamics NAV on the virtual machine. Set the parameters as follows:
Copy Code$NAV_DvdLocation = 'D:\NAVDVD' $NAV_UseAzureStorageForDvdTransfer = $true $NAV_DvdVhdName = "$NAV_AzureServiceName-DynamicsNAVDvd.vhd" $NAV_BakFile = 'D:\NAVDVD\SQLDemoDatabase\CommonAppData\Microsoft\Microsoft Dynamics NAV\71\Database\Demo Database NAV (7-1).bak' $NAV_DatabaseDiskSizeInGB = 10 $NAV_RemoteDatabaseBackupFile = 'C:\REMOTE\navdvd\SQLDemoDatabase\CommonAppData\Microsoft\Microsoft Dynamics NAV\71\Database\Demo Database NAV (7-1).bak'
Go to the Microsoft Dynamics NAV Instance settings section to specify parameters that configure Microsoft Dynamics NAV Server. Set the parameters as follows:
Copy Code$NAV_InstanceName = 'DynamicsNAV71_Instance1' $NAV_InstanceNameInternal = 'Inst1' $NAV_ManagementServicesPort = 9000 $NAV_ClientServicesPort = 9001$ $NAV_SOAPServicesPort = 9002 $NAV_ODataServicesPort = 9003 $NAV_ClickOnceWebSitePort = 9004 $NAV_WindowsServiceAccount = 'NSTService' $NAV_WindowsServiceAccountPassword = 'P@ssword312' $NAV_NAVAdminUserName = 'navadmin' $NAV_NAVAdminPassword = 'N@Vpw312' $NAV_LicenseFile = 'D:\NAVDVD\SQLDemoDatabase\CommonAppData\Microsoft\Microsoft Dynamics NAV\71\Database\Cronus.flf' $NAV_NewCompanyName = 'MyCompany
Go to the Security Certificates for NAV Client Services settings section to specify parameters that configure security certificates for the clients and ClickOnce installation of the Microsoft Dynamics NAV Windows client. Set the parameters as follows:
Copy Code$NAV_ClientServicesPfxFile = 'C:\Cloud\HowTo\MyAzureVM.pfx' $NAV_ClientServicesPfxPassword = "pfxpassword" $NAV_HttpsWebClientPfxFile = "" $NAV_HttpsWebClientPfxPassword = "" $NAV_ClickOnceCodeSigningPfxFile = 'C:\Cloud\HowTo\ClickOnceSignature.pfx' $NAV_ClickOnceCodeSigningPfxPassword = 'clickoncesignaturepassword'
Go to the Tool dependencies section to specify parameters for the tools for the deployment.
Copy Code$Global:AzurePowershellModuleFile = Join-Path ${env:ProgramFiles(x86)} 'Microsoft SDKs\Windows Azure\PowerShell\Azure\Azure.psd1' $Global:MageExeFile = Join-Path ${env:ProgramFiles(x86)} 'Microsoft SDKs\Windows\v8.0A\bin\NETFX 4.0 Tools\mage.exe' $Global:WinHttpCertCfgExeFile = Join-Path ${env:ProgramFiles(x86)} 'Windows Resource Kits\Tools\winhttpcertcfg.exe' $Global:MakeCertExeFile = Join-Path ${env:ProgramFiles(x86)} 'Windows Kits\8.0\bin\x86\makecert.exe'Save the file.
You are ready to run the script.
Running the Example-1VM Script
After you have set the parameters in the Set-PartnerSettings-Custom.ps1 file, you can run the script to create the virtual machine on Windows Azure and deploy Microsoft Dynamics NAV.
To run the example script
In the Windows PowerShell ISE, open Example-1VM.ps1
The script is located in the Cloud\HowTo directory.
Press F5 to run the script.
It will take approximately 30-45 minutes for the script to finish. If the script is completed without errors, then text similar to the following appears in the console.
Copy CodeThe NAV Server virtual machine is: MyNavVm.cloudapp.net The NAV Server virtual machine administrator username: NSTService The NAV Server virtual machine administrator password: 123NavVm!a The NAV Server Instance is: DynamicsNAV71_Ins1 The NAV Server account credentials: NSTService/P@ssword312 The Windows Client can be downloaded via ClickOnce at: http://MyNavVm.cloudapp.net:9004 The Web Client can be accessed at: https://MyNavVm.cloudapp.net/DynamicsNAV71_Ins1 A user has been added to the database with the following credentials: user=navuser password=N@Vpw312
A new virtual machine is added on Windows Azure. To see the new virtual machine, sign in to the Windows Azure Management Portal, and then choose VIRTUAL MACHINES.
Opening the RoleTailored Clients
When the script has completed without errors, you can then access the RoleTailored clients.
To open the Microsoft Dynamics NAV Windows client
Open an Internet browser.
In the address, type the following address:
http://MyNavVm.cloudapp.net:9004
Follow the instructions on the webpage to install the Microsoft Dynamics NAV Windows client.
To open the Microsoft Dynamics NAV Web client
Open an Internet browser.
In the address, type the following address:
https://MyNavVm.cloudapp.net/DynamicsNAV71_Instance1
Next Steps
Scaling the Microsoft Dynamics NAV Network Topology on Windows Azure
Security and Protection for Microsoft Dynamics NAV on Windows Azure