This walkthrough demonstrates how to create a query that links three tables. It also includes the SQL query that this query object represents.
 About This Walkthrough
This walkthrough illustrates the following tasks:
-
Creating a query that uses three tables and includes fields from those tables.
-
Setting up a totals method on a query column.
-
Specifying how to link the tables.
-
Specifying filters to limit the resulting dataset.
-
Running the query to view the data that this query describes.
Prerequisites
To complete this walkthrough, you will need:
-
Microsoft Dynamics NAV 2013 R2 with a developer license.
-
CRONUS International Ltd. demonstration database.
Story
Viktor is a Microsoft Certified Partner working for CRONUS International Ltd. He has been asked to create a query that displays the total number of items in each sales order for each salesperson. Viktor knows how to do this in SQL, but he wants to create a Microsoft Dynamics NAV query.
The SQL query for this dataset that Viktor wants is the following:
 Copy Code Copy Code | |
|---|---|
SELECT SP.Name, SUM(SL.Quantity) FROM "Salesperson/Purchaser" AS SP INNER JOIN "Sales Header" AS SH ON SP.Code = SH."Salesperson Code" INNER JOIN "Sales Line" AS SL ON SL."Document No." = SH."No." WHERE SL."Document Type" = 'Order' AND SL.Type = 'Item' GROUP BY SP.Name | |
Creating the Query with Three Tables
Viktor must create a query with Query Designer. The salesperson name is stored in the Salesperson/Purchaser table. The salesperson code for sales orders is stored in the Sales Header table. The quantity of items in sales orders is stored in the Sales Line table. To create this query, Viktor must do the following:
-
Add tables and fields by specifying data items and columns.
-
Set up a Totals method on the Quantity of the Sales Line table to return the total number of items in each sales order for each salesperson.
-
Link the Salesperson/Purchase table and the Sales Header table on the condition that the salesperson code matches, and then link the resulting dataset with the Sales Line table to find all sales lines for each sales header.
To add tables and fields to the query
In the development environment, on the Tools menu, choose Object Designer.
In Object Designer, choose Query, and then choose the New button.
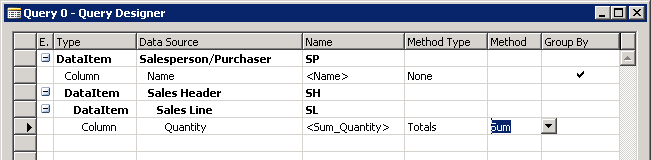
In Query Designer, add four rows as described in the following table. Choose the drop-down arrow to select tables and fields from the drop-down list box.
Line No. Type Data Source Name Line 1
DataItem
Salesperson/Purchaser
SP
Line 2
Column
Name
<Name>
Line 3
DataItem
Sales Header
SH
Line 4
DataItem
Sales Line
SL
 Tip Tip |
|---|
| The Name column in Query Designer is equivalent to using the AS keyword in an SQL statement. It defines an alias for the data item. Type a value in this column when you want to replace the default value with an alias. |
 Note Note |
|---|
| The Sales Header data item is indented. This indicates that this data item, which is the Sales Header table, is linked to the upper data item, which is the Salesperson/Purchaser table. |
| Note |
|---|
| The Sales Line data item is indented. This indicates that this data item, which is the Sales Line table, is joined to the parent data item, which is the result of the previous join. |
To set up a totals method on the Quantity column
In Query Designer, on the next line after the Sales Line data item, in the Type column, choose Column from the drop-down list box.
In the Data Source column, select Quantity from Sales Line - Field List window, and then choose the OK button.
In the Method Type column, choose Totals from the drop-down list box.
Note You want the query results to group by the Name field of the Salesperson/Purchaser table. This is automatically done for you. The query groups all fields that are not totals fields. In Query Designer, grouped fields are indicated by a check mark in the Group By column. In this example, the only column that is grouped is the Name field under the Salesperson/Purchaser data item. In the Method column, choose Sum from the drop-down list box.
The following figure shows the Query Designer for this example.
Specifying the Data Item Links
Viktor has added the data items and columns to the query, but he must specify how to link the data items to display the information he wants and eliminate unwanted records. For this query, Viktor wants the following:
-
Only salespersons who have sales orders.
The Salesperson/Purchase table and the Sales Header table have a field for the sales person's code in common. Viktor will link the Salesperson/Purchase table and the Sales Header table on the condition that the code for the salesperson in the two tables matches. This will exclude any salesperson who is not assigned a sales order. -
Only sales headers that have sales lines.
The Sales Header table and the Sales Lines table have a field for the document number in common. Viktor will link the Sales Header table and Sales Line table on the condition that the document number in the two tables matches. This will exclude any sales headers that do not have sales lines.
To link the Salesperson/Purchase table and the Sales Header table
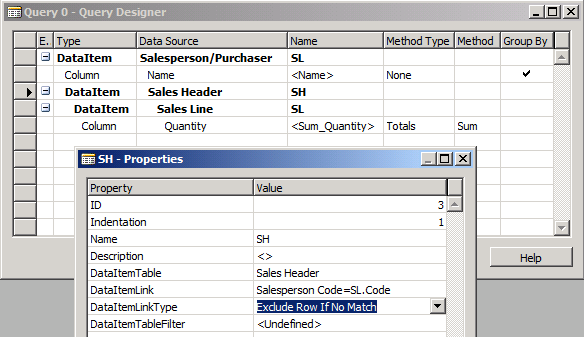
In Query Designer, select the SH data item row.
On the View menu, choose Properties. The SH - Properties window opens.
In the Value field of the DataItemLink property, choose the AssistEdit button.
The DataItem Link window opens. You use this window to create a reference link between the Salesperson Code field of the Sales Header table and the Code field of the Salesperson/Purchaser table.
In the DataItem Link window, in the Field column, choose the up arrow.
In the Sales Header - Field List window, select Salesperson Code, and then choose the OK button.
In the Reference DataItem field, choose the up arrow.
The DataItem List - Table window opens. You use this window to create a link to the Salesperson/Purchaser table.
In the DataItem List - Table window, select the SP data item, and then choose the OK button.
In the Reference Field, choose the up arrow.
In the Salesperson/Purchaser - Field List window, select Code, and then choose the OK button.
Choose the OK button to close the DataItem Link window.
In the SH Properties window, in the Value field of the DataItemLinkType property, choose Exclude Row If No Match from the drop-down list box.
The following figure shows the SH Properties window and Query Designer.
Close the SH Properties window, and then link the Sales Line table and the Sales Header table.
To link the Sales Line table and the Sales Header table
In Query Designer, select the SL data item row.
On the View menu, choose Properties. The SL - Properties window opens.
In the Value field of the DataItemLink property, choose the AssistEdit button.
The DataItem Link window opens. You use this window to create a reference link between the Document No. field of the Sales Line table and the No. field of the Sales Header table.
In the DataItem Link window, in the Field column, choose the up arrow.
In the Sales Line - Field List window, select Document No., and then choose the OK button.
In the Reference DataItem column, choose the up arrow.
The DataItem List - Table window opens. You use this window to create a link to the Sales Header table.
In the DataItem List - Table window, select the SH data item, and then choose the OK button.
In the DataItem Link window, in the Reference Field column, choose the up arrow.
In the Sales Header - Field List window, select No., and then choose the OK button.
Choose the OK button to close the DataItem Link window.
In the SL - Properties window, in the Value field of the DataItemLinkType property, choose Exclude Row If No Match from the drop-down list box.
Specifying Filters
Viktor wants to limit the records in the dataset to include only sales lines in which the Document Type is Order and the Type is Item. To achieve this, he will set up a filter on the Sales Line data item of the query.
To specify filters
In the SL - Properties window, in the Value field of DataItemTableFilter property, choose the AssistEdit button.
In the Table Filter window, in the Field column, choose the up arrow.
The Sales Line - Field List opens. You use this window to select a field from the Sales Line table on which to filter.
In the Sales Line - Field List window, select Document Type, and then choose the OK button.
In the Table Filter window, set the Type column to CONST.
In the Value column of the Document Type entry, enter Order.
On the next line in the Table Filter window, in the Field column, choose the up arrow, select Type from the Sales Line - Field List window, and then choose the OK button.
In the Table Filter window, set the Type column to CONST.
In the Value column of the Type entry, enter Item, and then choose the OK button.
Tip Specifying a filter in the DataItemTableFilter property is equivalent to using a WHERE clause in an SQL statement. 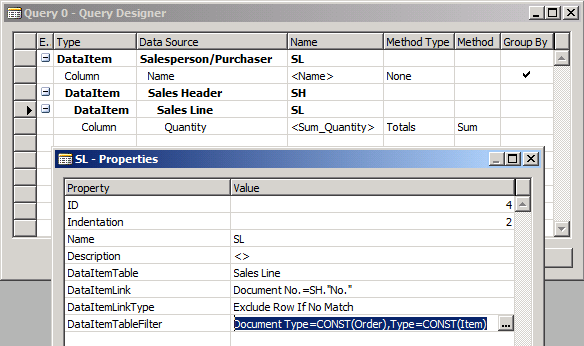
Close the Sales_Line - Properties window,
Saving and Running the Query
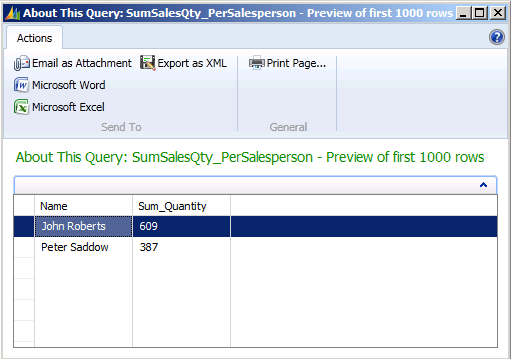
Viktor has finished designing his query. He saves the query and then runs it to verify that the resulting dataset is what he wants. He runs the query from Object Designer. The call to run the query runs on Microsoft Dynamics NAV Server and opens a view of the dataset in the Microsoft Dynamics NAV Windows client.
To save and run the query
On the File menu, choose Save.
In the Save As window, in the ID field, enter 50003. In the Name field, enter SumSalesQty_PerSalesperson. Verify that the Compiled check box is selected, and then choose the OK button.
In Object Designer, select query 50003, and then choose the Run button. When you run a query, you can see the data in the dataset.