


MenuSuites display menus on the Departments page in the Microsoft Dynamics NAV Windows client. MenuSuites contain links that enable you to browse application or objects, and make the applications or objects easier to access in the Microsoft Dynamics NAV Windows client. A MenuSuite contains a set of menus that enable you to access reports, pages, codeunits, and so on, from the Microsoft Dynamics NAV Windows client.
Microsoft Dynamics NAV 2013 R2 provides a basic MenuSuite that you can modify, or you can create new MenuSuites from the basic MenuSuite. You create MenuSuites in Object Designer and modify them in Navigation Pane Designer. This walkthrough demonstrates how to create a MenuSuite from the basic Menusuite for the Microsoft Dynamics NAV Windows client. For information about how to modify MenuSuites, see How to: Modify Menu Items in a MenuSuite.
 About This Walkthrough
This walkthrough shows you how to create a MenuSuite and modify department menus and menu items. This walkthrough illustrates the following tasks:
-
Creating a MenuSuite.
-
Adding a new department to the Departments page.
-
Modifying a department menu.
-
Modifying menu items in a department.
Prerequisites
To complete this walkthrough, you will need:
-
Microsoft Dynamics NAV 2013 R2 installed with a developer license.
-
The CRONUS International Ltd. demonstration database.
Story
Simon is a Microsoft Certified Partner working for CRONUS International Ltd. The company has recently reorganized. The Financial Management department has been converted to Accounting department and some of the menu items in the department will no longer be needed in the new Accounting department. The Human Resources department is no longer needed because the functions of that department have been contracted out to an agency. The functions of the Services department have been suspended because the department will closed until further notice. A new Customer Support department has been created at CRONUS International Ltd.. This new department will contain customer and vendor support information, including pages and reports.
Simon has been asked to perform the following tasks and create a MenuSuite that meets the following requirements:
-
Create a new department named Customer Support. This department should contain customer and vendor information such as a Customer Card page, Vendor List page, and Customer-Order Summary report. The information will be grouped under vendor and customer submenus. The List page should be accessed from the Lists category and the card page should be accessed from the Tasks subcategory.
-
Add customer reports to the Reports and Analysis submenu The MenuSuite should contain the Customer-Order Summary report, which should be accessed from the Reports and Analysis subcategory in the Customer Support department.
-
Remove departments and menu items that are no longer needed.
-
Modify the MenuSuite to reflect all the changes at have been made at CRONUS International Ltd.
Simon knows that he can create a MenuSuite in Object Designer and make the changes in Navigation Pane Designer to accomplish his task.
Creating the MenuSuite
You create MenuSuites from the basic MenuSuite that is provided in Microsoft Dynamics NAV and design it in Navigation Pane Designer. To create a new MenuSuite, choose a design level that your license allows. For this walkthrough, you will design the MenuSuite at the Dept-Partner design level. For more information about design permission levels, see Designing MenuSuites.
To create the MenuSuite
In the Microsoft Dynamics NAV Development Environment, choose Tools and then choose Object Designer.
In Object Designer, choose MenuSuite and then choose New. The Design Level window is displayed.
The following image shows the MenuSuite design levels that are available in Microsoft Dynamics NAV.
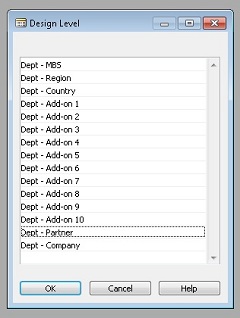
In the Design Level window, choose Dept - Partner and then choose OK to open Navigation Pane Designer.
The design level that you selected is shown in the header section of Navigation Pane Designer.
Right-click the Navigation Pane Designer header and then choose Close Navigation Pane Designer.
In the Save Changes dialog box, verify that Compile is selected and then choose Yes.
The MenuSuite that you created has an ID 1080, which is the ID for MenuSuites that are designed at the Partner level.
Adding a New Department
The next step is to create a menu for the new Customer Support department. You will make changes to the department menu and add menu items later.
To add a department
In Object Designer, choose the MenuSuite that you just created and then choose Design.
In Navigation Pane Designer, right-click the department tabs section and then choose Create Menu.
In the Create Menu window, in the Caption text box, enter Customer Support. This is name of the new department.
In the CaptionML text box, choose the EditAssist button to open the Multilanguage Editor.
 Note
Note By default, the language setting on your computer is used for CaptionML, so clicking the text box automatically enters the defaults values. In the Multilanguage Editor window, verify that Language is set to English (United States) and Value is set to Customer Support, and then choose the OK button. You can change the language in the Windows Language List window by choosing the up arrow in the Language column.
In the Bitmap text box, enter 10 and then choose OK. The Customer Support department menu is added to the MenuSuite. Valid bitmap numbers are 0-15. This is the bitmap that is displayed on the department menu in Navigation pane. However, the icons that are displayed on the departments on the Microsoft Dynamics NAV Windows client are different.
Modifying the Department Menus
Next, you will make the changes that were requested in the department menus. First, you will change the Financial Management menu to Accounting. You will also make changes to the menu items in the departments. You will delete the Human Resources department and hide the Services department. Simon knows that he may need the Services department in the future so he will hide it for now.
To modify the department menus
In Navigation Pane Designer, select the Financial Management menu, from the shortcut menu, choose Properties.
In the Menu Properties window, in the Caption text box, change the text to Accounting and then choose the OK button.
Select the Human Resources menu, and from the shortcut menu, choose Delete.
In the dialog box that opens, choose Yes. This removes this department from the MenuSuite.
Select the Services department menu. From the shortcut menu, choose Hide in Designer. This removes it from the list but is not deleted.
Select the Customer Support department menu. From the shortcut menu, choose Move Up. Move Customer Support below Accounting.
Modifying the Menu Items in a Department
You will now modify the menu items in the Accounting department and add menu items to the Customer Support department.
To modify the menu items
Select the Accounting department and notice the menu items that appear in the top half of Navigation Pane Designer.
Select the Periodic Activities group folder. From the shortcut menu, choose Properties to open the Group Properties window.
Clear the Department Page check box and then choose OK. This removes the Periodic Activities group folder from the department page in the Microsoft Dynamics NAV Windows client.
Select the Cash Management group folder. From the shortcut menu, choose Delete. This removes the folder and all menu items that are in it.
Select the Customer Support department you created earlier. Notice that it does not contain any menu items or group folders.
Right-click the menu items section, choose Create Group, and then name the folder Customers. You will add pages that are related to customers in this group.
Expand the Customer folder node, right-click [Empty Group], and then choose Create Item to open the Create Item window.
In the Object Type list, choose the drop-down arrow, and then select Page.
In the Object ID text box, choose the up arrow to open the Page List window and then choose Customer Card (21) and then choose OK.
Accept the defaults values for the Caption and CaptionML text boxes.
In the Department list box, select Tasks and then choose the OK button. This puts this menu item in the Tasks sub menu.
In the Create Item window, choose the OK button.
Right-click the Customer Card menu item that you just created and then choose Create Item to open the Create Item window.
Repeat steps 8 through 12 and set the following values in the Create Item window to add the Customer List (22) Page.
Object Type
Page.
Object ID
Customer List.
Caption
Customer List.
CaptionML
ENU=Customer List.
Department
Lists.
This puts this menu item in the Lists sub category.
Right-click the menu items section, choose Create Group and then name the folder Vendors. You will add pages that are relate to vendors in this group.
Expand the Vendors group folder node, right-click [Empty Group], and choose Create Item to open the Create Item window.
Repeat steps 8 through 12 and set the following values in the Create Item window to add the Vendor Card (26) page.
Object Type
Page.
Object ID
Vendor Card.
Caption
Vendor Card.
CaptionML
ENU=Vendor Card.
Department
Tasks.
This puts this menu item in the Tasks sub category.
Right-click the Vendor Card menu item you just added and then choose Create Item… to open the Create Item window.
Repeat steps 8 through 12 and set the following values in the Create Item window to add the Vendor List (27) pages.
Object Type
Page.
Object ID
Vendor List.
Caption
Vendor List.
CaptionML
ENU=Vendor List.
Department
Lists.
This puts this menu item in the Lists sub category.
Right-click Vendors and then choose Create Item… to open the Create Item window.
Repeat steps 8 through 12 and set the following values in the Create Item window to add the Customer-Order Summary (107) report.
Object Type
Report.
Object ID
Customer-Order Summary.
Caption
Customer-Order Summary.
CaptionML
ENU=Customer-Order Summary.
Department
Reports and Analysis.
This puts this menu item in the Reports and Analysis sub category.
If the item you want to create already exists, instead of creating a new one you can just insert the existing item. For information about how to insert an item, see How to: Insert Items in a MenuSuite.
You have made all the changes that were requested. You will now save the MenuSuite and run it.
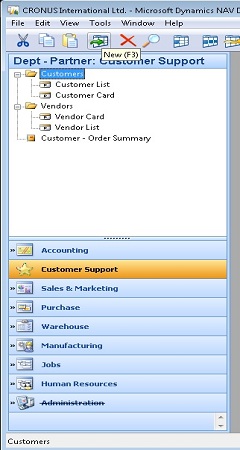
The following image shows the departments and menu items in the Customer Support department in Navigation Pane Designer. The MenuSuite you have created in Navigation Pane Designer is similar to this image.
Right-click the Navigation Pane Designer header and choose Close Navigation Pane Designer to save the MenuSuite. Notice the ID and the name of the MenuSuite you are saving. The ID and the name are given by Microsoft Dynamics NAV.
In the Save Changes dialog box, verify that Compile is selected and then choose the OK button.
Running and Testing the MenuSuite
MenuSuites cannot be run directly in the development environment. You run MenuSuites in the Microsoft Dynamics NAV Windows client. In the Microsoft Dynamics NAV Windows client, menus are located under Departments and the submenus under the departments. Menus can be selected by department or by category.
To run and test the MenuSuite
Open the Microsoft Dynamics NAV Windows client.
Note If the Microsoft Dynamics NAV Windows client is already open, you must close it and reopen it. Otherwise, the MenuSuite that you created will be displayed. In the leftmost pane, choose Departments.
Verify that the Customer Support department and all the changes that you made appear in the Microsoft Dynamics NAV Windows client.
Next Steps
You might want to create another MenuSuite at the Dept - Company level. This MenuSuite will inherit from the MenuSuite that you just created in this walkthrough.