


To change an icon that is displayed with a department on the Departments page of the Microsoft Dynamics NAV Windows client, you use the Microsoft Dynamics NAV Development Environment to configure the MenuSuite object that is used by the Microsoft Dynamics NAV Windows client. Each button in the MenuSuite corresponds to a department in the Microsoft Dynamics NAV Windows client and each button includes a Bitmap Property that you use to specify its icon. To display an icon with a department in the Microsoft Dynamics NAV Windows client, you enter a bitmap ID. The bitmap ID corresponds to an icon that is displayed with the department in the Microsoft Dynamics NAV Windows client.
To change a Department icon
In the development environment, open the MenuSuite object for the Microsoft Dynamics NAV Windows client as follows:
-
On the Tools menu, choose Object Designer, and then choose the MenuSuite button.
-
In Object Designer, select the MenuSuite that you want to modify, and then choose the Design button.
-
On the Tools menu, choose Object Designer, and then choose the MenuSuite button.
In navigation pane on the left, select the department menu button that you want to change, and on the shortcut menu, choose Properties.
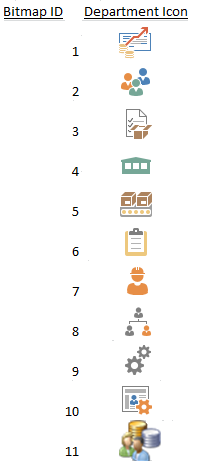
In the Bitmap field, enter the ID of the icon that you want to appear with the department in the Microsoft Dynamics NAV Windows client. The bitmap ID values that are valid are 0 through 15.
The following illustration shows the bitmap ID and the corresponding icons that are displayed with the department in the Microsoft Dynamics NAV Windows client.
Choose the OK button.