


This topic describes how to use a FixedLayout group control on a page to arrange page fields in rows and columns, similar to a matrix. A FixedLayout group control is typically used to display statistical data. The following illustration shows an example of a page that uses a FixedLayout control to show sales totals for different time periods.
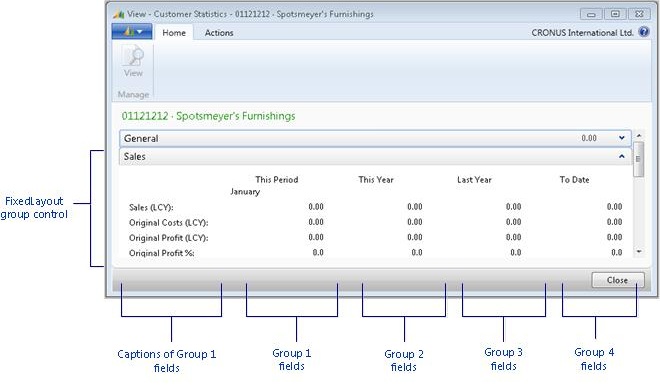
Fields in a FixedLayout group control are displayed in a FastTab with a heading for each row and column. For more information about the FixedLayout group control, see Arranging Fields in Rows and Columns Using a FixedLayout Control.
 Note Note |
|---|
| This feature is not fully supported by the Microsoft Dynamics NAV Web client. If the page is displayed in the Microsoft Dynamics NAV Web client, you can experience misalignment of fields and captions with some configurations. |
 Important Important |
|---|
| Previous versions of Microsoft Dynamics NAV supported having a FixedLayout control directly under a ContentArea. In Microsoft Dynamics NAV 2013 and later versions of Microsoft Dynamics NAV, you must make sure that the FixedLayout control is nested in a Group control. For more information, see Recommended Usage of GridLayout and FixedLayout. |
To arrange page fields in rows and columns
Open the page in Page Designer.
In Page Designer, insert a blank line where you want to locate the fields.
Set the Type and SubType field to Group. In the Caption field, type the text that you want as the heading of the FastTab that contains the fields.
On the next line, set the Type to Group and SubType field to FixedLayout.
On the next line, set the Type and SubType field to Group. This defines the placeholder for the first column of fields. To add a heading to the column, type the text in the Caption field.
On the next line, set the Type to Field. This defines the first field in the column. In the Caption field, type the text that you want to use as the heading for the row.
Specify the data source for the field by doing one of the following:
-
If the data source is a field of the table that is associated with the page, then on the View menu, choose Field Menu, select the field, and then choose the OK button.
-
If the data source is a variable, then on the View menu, choose C/AL Globals or C/AL Locals, and then create the variable. After you create the variable, in the SourceExpr field in Page Designer, choose the AssistEdit button and select the variable.
-
If the data source is a field of the table that is associated with the page, then on the View menu, choose Field Menu, select the field, and then choose the OK button.
Repeat steps 6 and 7 to add the remaining fields in the first column.
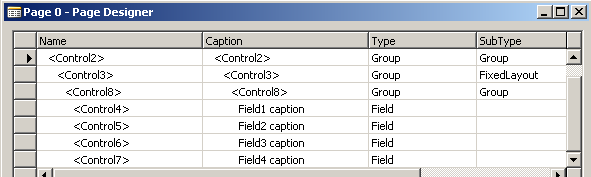
The following illustration shows a Page Designer example that has four fields.
Repeat steps 5 through 8 to add group controls that define the remaining columns.
Note You do not need to specify captions for these fields. Only the captions of fields in the first column define the row headings.